
Saturday, December 31, 2011
Wednesday, December 14, 2011
DIY-Zen Stone Spa Bath Mat

Good To Know:
The mat is durable enough for indoor and outdoor use. You could make an additional project as a welcome mat for your home’s entryway.
Step-by-Step Instructions
1. Measure and cut a 32-inch-long piece of shelf liner. Fold it in half, and cut down the center to make two 16- x 24-inch rectangles. Stack the pieces on top of each other. (When gluing the stones, the adhesive will seep through the top piece of shelf liner.)
2. Using your computer, create a large letter for a template, and print it out. I used a 700-point type size to create the “B” shown here. Use utility scissors to trim out the letter, and center it on the piece of shelf liner. Trace the letter onto the liner using a permanent marker, and then remove the template.

3. Arrange black stones to fill the traced letter. Experiment with various sizes to avoid large gaps. Use a caulk gun and a generous amount of clear silicone sealant to secure the stones to the shelf liner.
4. Fill the remaining portions of the mat with the white stones and small pea gravel. Work with small sections at a time because the sealant sets in about 10 minutes. Let the sealant cure overnight. Turn over the mat, and trim away any exposed edges of shelf liner.
Thursday, November 17, 2011
DIY-Wall Art - Switchboard
The savvy style of this project comes from screwless wall plates in black, white, and silver finishes. The clean and contemporary design coordinates well with a sleek home office.
 Painted the same color as the wall, the plywood piece blends in and allows the wall plates to stand out.
Step 1: Cut the plywood sheet to 20 x 24 inches.
Step 2: Sand the plywood piece, and wipe clean. Apply spray primer and paint to the piece, allowing each coat to dry.
Step 3: Place the wall plates at right angles on the plywood piece, alternating colors as shown here. Glue the plates to the plywood piece. Allow glue to dry completely.
Step 4: Hang the project using picture hangers and appropriate hardware for your wall type.
Monday, November 14, 2011
DIY-Curtain Call

Grand Entrance
Create an inviting nook along a blank wall in a foyer, a bedroom, or a hallway. Add a bench to stage the area for functional and fashionable seating. We used two moulding pieces to construct a cornice and attached lightweight curtains for flowing flair.
Step-by-Step Instructions:
1. Use wood glue to attach two corner moulding pieces together, creating a square dome that is hollow in the center. Clamp the pieces together; allow to dry.
2. Use wood filler to fill in any gaps on the sides, and allow to dry.

3. Using a 3∕16-inch bit, drill four holes into one side of the assembled piece (as shown in the detail photo).
4. Paint the piece (both inside and outside) in your desired color. When dry, lightly coat the piece with glaze.
5. Cut a 3-inch piece of 18-gauge wire, and string it through one curtain’s rod pocket. Scrunch the curtain on the wire, and staple over the wire and through the fabric to attach the curtain to the inside left of the cornice. Repeat the process for the right side.
6. Locate a stud on your wall, and attach the piece to the wall with wood screws through the holes drilled in.
7. If you have drywall, be sure to hang with anchoring screws.
Tip: Lightweight fabrics work best to avoid putting too much weight on the cornice.
Sunday, October 16, 2011
DIY-Kids Room goes Fishing

Super cute art decor for the kids room!
INSTRUCTIONS:
Step 1: Starting with a 2'x2' piece of ¼" birch plywood, cut a 15"x15" square. This will be used as the backer for the frame. Sand, prime, and paint the backer; then set it aside to dry. (We chose Valspar Exotic Sea (#331652), Pistachio Satin (#287422), and Mediterranean Gloss (#287419) paint colors for the three backers pictured.)
Step 2: Apply the fish template to a piece of 1"x4" poplar or pine, and cut out the shape with a jigsaw. Sand, prime, and paint the fish. (We used Valspar Satin La Fonda Copper (#331655) paint.)
Step 3: To frame the painted plywood backer using 1"x4" poplar or pine boards, cut top and bottom frame parts 16" long, and cut the sides 9" long. Glue and clamp the frame parts so the ends of the short pieces butt up against the inside edges of the long pieces; allow the glue to dry.
GOOD TO KNOW: Because this frame will be painted, you can patch minor gaps using homemade wood putty. Squirt a small amount of glue into a disposable container such as a paper cup. Mix in sawdust left over from cutting your frame boards until it forms a paste. Using your finger, work the paste into the gaps until the surface feels smooth. Then sand your patch flush with the wood.
Step 4: Sand the surface and edges of the frame. Then paint the outside face and all edges (but not the back) and let the frame dry. (We painted the frame with Valspar Satin White (#28277).)
Step 5: Center the fish in the frame and glue in place. (Consider placing a large book or other heavy object on the fish after gluing to ensure it adheres to the backer.)
Step 6: Attach a picture-hanger centered along the top edge of the backer, then hang on the wall.
Monday, October 3, 2011
Buliding Blocks Wall Art
Make multidimensional art with moulding pieces painted in cool colors and arranged in a checkerboard pattern. The repetition of circles and squares keeps the look simple and perfect for any casual space.
 The artwork’s square shape perfectly fits this blank wall. If needed, cut the size of the plywood sheet to accommodate your space.
Step 1: Lightly sand the plywood piece, and wipe clean. Apply spray primer and spray paint to the piece, allowing each coat to dry.
Step 2: Divide 18 wooden rosettes into four groups. (You’ll have five rosettes in two groups and four rosettes in two other groups.) Spray-paint each group a different color, and allow to dry. TIP: Apply two or three light coats rather than one heavy coat.
Step 3: Arrange the rosettes in rows on the plywood piece, alternating colors as shown here. Align the edges of the outer rosettes with the plywood edges. Use wood glue to attach the rosettes to the plywood piece. Allow glue to dry completely.
Step 4: Hang the project using picture hangers and appropriate hardware for your wall type.
Thursday, September 22, 2011
Modern Stencil for a Stylish wall

Step 1: Enlarge a graphic stencil so the whole pattern can be repeated vertically to fit your room height (with spaces between stencils), and have three copies soft-laminated at the copy shop in case you damage some. Cut out the patterns with a crafts knife.
Step 2: Map out the number of columns you can fit along one wall and the space between columns. At one corner attach a stencil near the top of the wall with painter’s tape so the sides are vertical.
Step 3: Using a lightly coated foam roller, apply thin layers of paint over the stencil. (Press lightly or you’ll squeeze paint behind the stencil.) Then tape another stencil below the first at the margin you want and paint that design. Repeat until you reach the baseboards.

Step 4: With the first column done, space the stencil horizontally and stencil the next column. Repeat until you fill the wall.
Tuesday, August 2, 2011


Monday, July 25, 2011
New Office Project-July 2011
A cool retro inspired,
yet functional office and craft area.


Let us take your house and make it into your home!
Thursday, July 7, 2011


Saturday, June 11, 2011


Sunday, May 15, 2011
Steppin it Up-Create a Baseboard on a Dime.
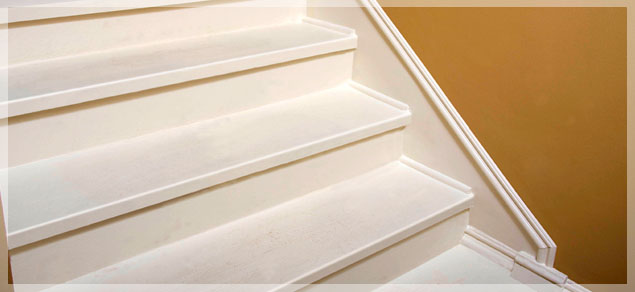
Step 2: Determine the height of the faux baseboard and apply painter’s tape to desired height.
Step 3: Paint faux baseboard desired color (we matched ours to the stairs).

Step 5: Using finishing nails, attach shoe molding to edge of stair tread (where stair meets wall). Using finishing nails, attach chair rail to top of faux baseboard.
Step 6: Touch up nail holes with paint.
Sunday, April 17, 2011
The psychology of color-Enhance you enviroment
The psychology of color

1.) Create the illusion of space with bright colors: If you want your home to look larger than it really is – especially when it is about to go on the market – you can use bright and vibrant colors like yellows and eggshells to add space to your home exterior. As a warning, avoid the common color white. Although it can add space, it is nowhere near as effective as tinted colors.
2.) Appeal to a highly educated crowd with complex colors: For home exteriors and interiors, using colors that consist of more than one word can often appeal to highly educated people. On the other hand, simple colors appeal to lower budgets and lower education levels. When choosing complex colors, think of names like forest green or eggshell white.
3.) Build appetites in your kitchen with red: Red has been shown to increase appetite in most people – one of the reasons that many restaurants choose red patterns in their dining rooms. Using red in your kitchen to increase appetite is as simple as blending beige walls with red shutters or cabinet doors.

4.) Use foyer blends to naturally combine interior and exterior paint: One of the best ways to wow your guests as they enter your home is to use a blend of your interior and exterior colors in your foyer or entryway. You can also use your exterior paint color on parts of your interior to achieve the same general effect.
 5.) Warm up your home with deep tones during the winter: Using reds, oranges and yellows in your home paint decor can make the home seem more welcoming from the outside or warmer on the inside – especially during the winter. If you are selling a home during the winter and are planning to paint, keep this in mind.
6.) Cool off in the summer with colder colors: Along the same lines as warm colors in the fall, cool colors, especially blue, can make your home seem fresh, cool and clean during the summer. A white exterior with blue trim is a popular choice for summer homes and painting projects.
 7.) Use colors from your past: Many color consultants will say that using familiar colors from your childhood that remind you of fond memories – especially in the kitchen – can bring those memories back and create a pleasant mood. If you can’t remember any colors from your kitchen when you were growing up, just remember that reds and yellows are perfect for playful yet sophisticated kitchens.
8.) Use relaxing colors in relaxing rooms: In your bedroom and bathroom, cool colors can form a relaxing atmosphere with paint. Consider shades of blue, green or even lavender to calm yourself in your escape rooms. When using this technique, remember that the darker the shade of color you choose, the more apparent the effect.
 9.) Stay away from red if you have high blood pressure: While it can increase appetite in your kitchen, dark shades of red are often associated with high blood pressure and irritability in other rooms of the house. If you would like a darker color paint for your bedroom or living room, go for a cooler color rather than a warm one.
 10.) Flatter yourself with a familiar color in the bathroom: Love to wear a particular color? Consider that color in the bathroom. Think you don’t look very good in a color? Avoid this color for the bathroom at all costs. You want to look good when you check yourself in the bathroom mirror. Having a favorite color in the background really does help.
11.) Combine moods for an aggressive workout room: While it might make sense to use red paint in a workout room, this can actually overdo the sensation of feeling hot. If you want to use a warm color in your workout room, consider a delightful blend of blue and yellow paint on the walls. You can also go for a relaxing green-blue combination for a cooling effect to extend workouts.
12.) Concentrate in your home office with green: Green inspires concentration in a home office setting. And, after all, the faster you get your work done, the more time you will have to spend with your family. In addition to a green plant, try painting the room with a light green. However, don’t turn your home office into a jungle. Over doing it can be distracting. Any painting contractor will tell you green is one of the most popular colors being used right now in home design.

13.) Inspire optimism with yellow: As you might expect, yellow is a perfect color for a sunroom. However, a great way to use yellow inside your home is in an entryway or enclosed front porch. As you leave for the day to go to work or school, the yellow paint in this area will give you one last boost of optimism before the daily grind.
14.) Don’t be fooled by purple: Although purple signifies wealth and romanticism, it is very rare in the natural world and can be very artificial within your home decor. If you really want some purple in your home, try blending it with more natural colors like subtle yellows or greens.
15.) Blend brown for a natural look in your den: If you love the look of wood or leather or already incorporate this earthy natural look in any room of your house, adding some brown paint can amplify the appearance. You should be warned, though, that brown can cause depression in some people.
 16.) Black isn’t just for a teenager’s room: Black can be a tough nut to crack if used to paint your walls. The problem with black is that it gives the illusion of tight space. If you would like to satisfy your teenager’s cries for a black room, consider a black ceiling with a few stars. If you want to go all out, you can decorate with a nighttime landscape theme across the room.
17.) Use pink for tranquility in a meditation room: If you are lucky enough to have a separate area in your home just for meditation or relaxation, you might surprised of the effects that some pink can have in your paint scheme. Some sports teams actually paint the away team’s locker room pink as it has been shown to cause a lack of energy.

18.) There’s a reason bathroom fixtures are usually white: White not only symbolizes fertility and cleanliness, but it also makes cleaning easier in the bathroom. You don’t want stains to be hidden so they go without being cleaned. Knowing that the bathroom is clean and fresh with lovely white paint can put your mind at ease and inspire relaxation.
19.) Trust orange for a sick room or asthmatic child’s room: Orange is often associated with improved lung function as well as increased energy. As well as working well in any workout room, a mild orange can be very helpful to those recovering from illness or with lung problems.
20.) When all else fails, look to nature: When using color psychology in your home, choose paints that remind you of nature. Colors that appear in nature will blend perfectly in your home interior. However, with the exterior of your home, bright colors are, more often than not, the best choice for a more welcoming living space.


1.) Create the illusion of space with bright colors: If you want your home to look larger than it really is – especially when it is about to go on the market – you can use bright and vibrant colors like yellows and eggshells to add space to your home exterior. As a warning, avoid the common color white. Although it can add space, it is nowhere near as effective as tinted colors.
2.) Appeal to a highly educated crowd with complex colors: For home exteriors and interiors, using colors that consist of more than one word can often appeal to highly educated people. On the other hand, simple colors appeal to lower budgets and lower education levels. When choosing complex colors, think of names like forest green or eggshell white.
3.) Build appetites in your kitchen with red: Red has been shown to increase appetite in most people – one of the reasons that many restaurants choose red patterns in their dining rooms. Using red in your kitchen to increase appetite is as simple as blending beige walls with red shutters or cabinet doors.

4.) Use foyer blends to naturally combine interior and exterior paint: One of the best ways to wow your guests as they enter your home is to use a blend of your interior and exterior colors in your foyer or entryway. You can also use your exterior paint color on parts of your interior to achieve the same general effect.

6.) Cool off in the summer with colder colors: Along the same lines as warm colors in the fall, cool colors, especially blue, can make your home seem fresh, cool and clean during the summer. A white exterior with blue trim is a popular choice for summer homes and painting projects.

8.) Use relaxing colors in relaxing rooms: In your bedroom and bathroom, cool colors can form a relaxing atmosphere with paint. Consider shades of blue, green or even lavender to calm yourself in your escape rooms. When using this technique, remember that the darker the shade of color you choose, the more apparent the effect.


11.) Combine moods for an aggressive workout room: While it might make sense to use red paint in a workout room, this can actually overdo the sensation of feeling hot. If you want to use a warm color in your workout room, consider a delightful blend of blue and yellow paint on the walls. You can also go for a relaxing green-blue combination for a cooling effect to extend workouts.
12.) Concentrate in your home office with green: Green inspires concentration in a home office setting. And, after all, the faster you get your work done, the more time you will have to spend with your family. In addition to a green plant, try painting the room with a light green. However, don’t turn your home office into a jungle. Over doing it can be distracting. Any painting contractor will tell you green is one of the most popular colors being used right now in home design.

13.) Inspire optimism with yellow: As you might expect, yellow is a perfect color for a sunroom. However, a great way to use yellow inside your home is in an entryway or enclosed front porch. As you leave for the day to go to work or school, the yellow paint in this area will give you one last boost of optimism before the daily grind.
14.) Don’t be fooled by purple: Although purple signifies wealth and romanticism, it is very rare in the natural world and can be very artificial within your home decor. If you really want some purple in your home, try blending it with more natural colors like subtle yellows or greens.
15.) Blend brown for a natural look in your den: If you love the look of wood or leather or already incorporate this earthy natural look in any room of your house, adding some brown paint can amplify the appearance. You should be warned, though, that brown can cause depression in some people.

17.) Use pink for tranquility in a meditation room: If you are lucky enough to have a separate area in your home just for meditation or relaxation, you might surprised of the effects that some pink can have in your paint scheme. Some sports teams actually paint the away team’s locker room pink as it has been shown to cause a lack of energy.

18.) There’s a reason bathroom fixtures are usually white: White not only symbolizes fertility and cleanliness, but it also makes cleaning easier in the bathroom. You don’t want stains to be hidden so they go without being cleaned. Knowing that the bathroom is clean and fresh with lovely white paint can put your mind at ease and inspire relaxation.
19.) Trust orange for a sick room or asthmatic child’s room: Orange is often associated with improved lung function as well as increased energy. As well as working well in any workout room, a mild orange can be very helpful to those recovering from illness or with lung problems.
20.) When all else fails, look to nature: When using color psychology in your home, choose paints that remind you of nature. Colors that appear in nature will blend perfectly in your home interior. However, with the exterior of your home, bright colors are, more often than not, the best choice for a more welcoming living space.

Wednesday, February 9, 2011
DIY-How to make a High End Feather Wreath
While visiting a beautiful home decor store in Brooklyn, I saw a large, striking feather wall piece. The price tag was far too steep for me, but I knew I could recreate it for myself. Living near LA, I'm lucky to have the garment district and its specialty shops relatively close by, which is where I picked up some colorful feathers. A few days and less than $100 later, I had my very own custom feather art piece.
Even if you don't have a garment district in your town, you can find the materials online pretty easily, and make this distinctive art for your home.

What you’ll need
Feathers of various lengths. You can use up to three different sizes.
One round feather centerpiece mounted on fabric for the center of the canvas (something like this. You could also make your own using a small circle of fabric and the basic instructions below for placing feathers)
Multi-purpose white glue
Round canvas (I used a 20", but you could go bigger or smaller, depending on your space)
A few heavy objects, like large books, to place on top of each layer as it dries
Instructions
1. If you are using different color feathers, decide what order you want the colors to appear on the canvas. The outermost layer will have the least amount of visibility and the layers closest to the center will be the most visible.
2. Glue your first layer of feathers along the perimeter of the canvas. Put glue on the entire bottom 1 ½ to 2 inches of each feather to ensure they stick. Each layer will cover about half of the previous layer, so the glued parts won’t show.
3. Place the heavy objects on top of this layer for about an hour. Remove and let stand for about five more hours.
 4. Repeat the gluing with the next layer, moving it down far enough onto the canvas so that you have as much or as little of the previous layer showing.
5. Again, place the heavy objects on top of this layer for about an hour. Remove and let stand for about five more hours.
6. Repeat these steps, gluing layers onto the canvas’s shrinking perimeter till you get to the center of the canvas.
7. Using a generous amount of glue, affix the feather centerpiece in the center, covering the ends of the last layer of feathers.
8. Place the heavy objects on top for two to three hours. Remove and let stand for a day.
9. Pick up the piece gently, and make sure all layers are in place and secure, and then hang it on the wall and enjoy your custom made artwork!
Even if you don't have a garment district in your town, you can find the materials online pretty easily, and make this distinctive art for your home.

What you’ll need
Feathers of various lengths. You can use up to three different sizes.
One round feather centerpiece mounted on fabric for the center of the canvas (something like this. You could also make your own using a small circle of fabric and the basic instructions below for placing feathers)
Multi-purpose white glue
Round canvas (I used a 20", but you could go bigger or smaller, depending on your space)
A few heavy objects, like large books, to place on top of each layer as it dries
Instructions
1. If you are using different color feathers, decide what order you want the colors to appear on the canvas. The outermost layer will have the least amount of visibility and the layers closest to the center will be the most visible.
2. Glue your first layer of feathers along the perimeter of the canvas. Put glue on the entire bottom 1 ½ to 2 inches of each feather to ensure they stick. Each layer will cover about half of the previous layer, so the glued parts won’t show.
3. Place the heavy objects on top of this layer for about an hour. Remove and let stand for about five more hours.

5. Again, place the heavy objects on top of this layer for about an hour. Remove and let stand for about five more hours.
6. Repeat these steps, gluing layers onto the canvas’s shrinking perimeter till you get to the center of the canvas.
7. Using a generous amount of glue, affix the feather centerpiece in the center, covering the ends of the last layer of feathers.
8. Place the heavy objects on top for two to three hours. Remove and let stand for a day.
9. Pick up the piece gently, and make sure all layers are in place and secure, and then hang it on the wall and enjoy your custom made artwork!
Subscribe to:
Comments (Atom)